

How To Install Nginx On Centos
What is Nginx?
Nginx (pronounced 'engine 10') is an alternative to Apache and is considered to be ane of the nigh popular HTTP web servers in the globe. As opposed to Apache, Nginx tends to consume fewer resources and improves server responsiveness. Its result-driven design is what makes information technology resources-friendly.
Higher up all, it allows admins to prepare up advanced configurations and tin deal with a high load of concurrent connections. Also existence a adept fit for an HTTP spider web server, Nginx also works as a reverse proxy, load balancer, and standard post server.
In this article, you volition learn how to install and configure Nginx on CentOS 7.
Prerequisites
- A CentOS self-managed server or VM
- A Domain. You will demand to connect a domain to your Nginx web server
- Sudo or root privileges [[email protected] ~]
- SELinux fix properly
How to Install Nginx on CentOS seven
Generally, CentOS is the preferred distribution package in the hosting manufacture. Currently, CentOS eight is the latest version, while CentOS vii is supported until the year 2024.
The configuration process beneath details the steps necessary to prepare upwardly Nginx on CentOS 7.
For installation instructions for CentOS 8, please read How to Install Nginx on CentOS 8.
Step 1: Update Repository Package Lists
To exercise so, run the following command:
sudo yum -y update -y is an optional parameter. It serves to avoid confirmation questions. We will exist using it a lot, every bit you lot will notice. If yous do not use this parameter, yous volition exist prompted to confirm your commands.
Step 2: Install Extra Packages for Enterprise Linux (EPEL)
Nginx is not available in the standard repositories that come with the CentOS package, so y'all volition need to install the EPEL repository on your server. EPEL is complimentary to use and provides numerous open-source packages to install with Yum.
To install EPEL, run the following command using the Yum package director:
sudo yum install -y epel-release 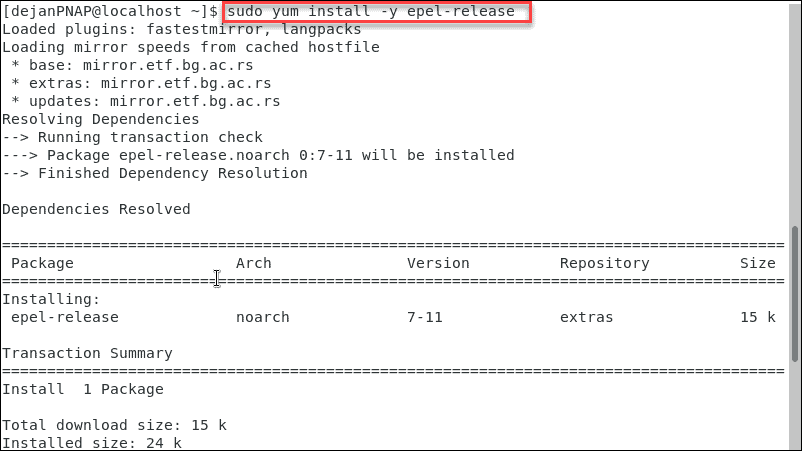
Step three: Install Nginx
Stride number two has added the Nginx repository to your server. Now, you tin install Nginx by running the following yum command:
sudo yum –y install nginx 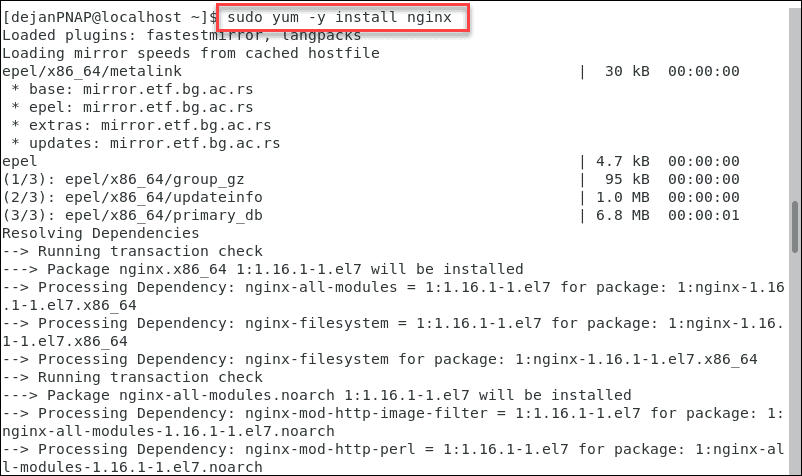
Step 4: Start Nginx Service
Your instance of Nginx is installed, but it won't start automatically.
To start Nginx, run:
sudo systemctl kickoff nginx Subsequently you hitting enter, you lot will not get a return value. However, Nginx should take started. To check its status, run:
sudo systemctl status nginx 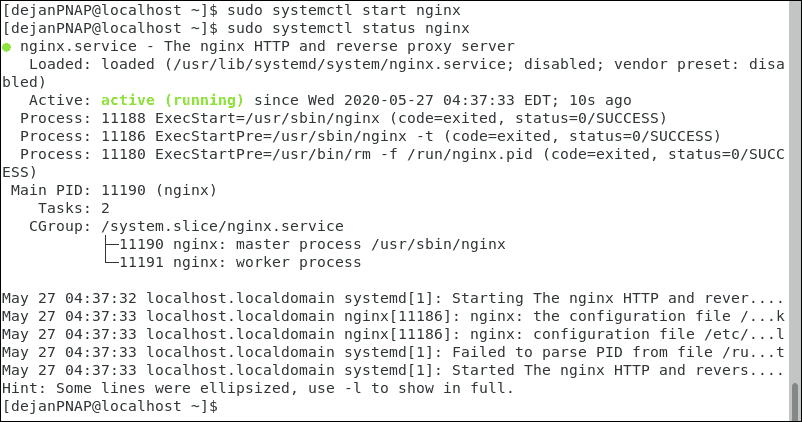
There should be a green piece of text that reads 'active (running).' If you lot can't detect it, your instance of Nginx might not have started successfully.
Notation: If you already have an Apache server running, you will need to disable information technology earlier starting Nginx. Utilize the sudo service httpd stop control. Bear in mind that disabling Apache will bring downwards any currently hosted website.
You disabled Apache, simply it still might start automatically during server reboot. Disable automated starts by running the following control:
sudo systemctl disable httpd
Pace 5: Configure Nginx to Start on Kicking
Most admins will desire to make sure that NGINX starts up automatically whenever the server restarts. To gear up this up, run:
sudo systemctl enable nginx Step 6: Configure Firewall to Allow Traffic
CentOS vii enables firewalls by default and blocks admission to ports 80 and 443. It will block whatsoever inbound HTTPS and HTTP packets from Nginx.
To allow HTTP and HTTPS traffic, run the following commands:
firewall-cmd --zone=public --permanent --add-service=http firewall-cmd --zone=public --permanent --add together-service=https firewall-cmd --reload After each command, you should see success indicating that the control was executed correctly.

Step 7: Verify Nginx Install
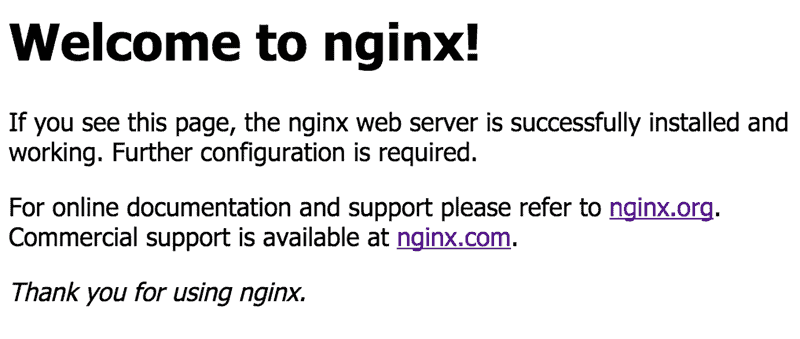
The easiest way to check whether Nginx is running properly is by visiting your server's public IP accost. Simply open your spider web browser and visit http://server_IP_or_domain_name/
First, find your server'due south public IP address.
ip a 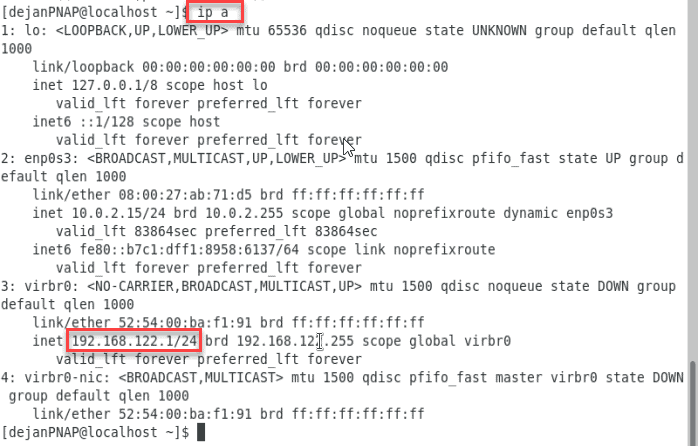
Our IP address is 192.168.122.ane/24. Copy your IP address and paste information technology into your browser. This should load the Welcome to Nginx page.
How to Resolve the 'test failed' Mistake
If y'all receive a 'test failed' error message for the nginx.conf file, you might be facing an IP address event.
The Nginx service listens to IPv4 and IPv6, by default. Your test will fail if your server doesn't back up IPv6. Notwithstanding, this tin can be stock-still by modifying the main configuration file.
Open the principal configuration file, /etc/nginx/nginx.conf. Find and annotate out the following line:
heed [::]:80 default_server; Simply add '#' at the beginning of the line. It should look similar this:
# heed [::]:80 default_server; Salve the changes you have made and reload the Nginx service.
sudo systemctl reload nginx Scan to your server'south IP address in your browser. You should see the default Nginx test page.
Nginx Configuration Files and Root
You will nearly definitely need to know the location of Nginx configuration files and the default Nginx server root directory.
Additional Server Blocks
On Apache, admins employ virtual hosts to run multiple websites. With Nginx, running several websites on a single server is accomplished with server blocks.
Additional server blocks are added by creating new configuration files with a .conf file extension. Place these files in /etc/nginx/conf.d and they will be loaded each time Nginx starts.
Default Nginx Server Root
The default Nginx server root directory is /usr/share/nginx. This is specified in the default server cake configuration file, located at /etc/nginx/conf.d/default.conf.
The default server document root directory which contains web files is usr/share/nginx/html.
Global Configuration
Global configurations can be tweaked past modifying the main Nginx configuration file located at /etc/nginx/nginx.conf. This configuration file is cleaved down into contexts. Past default, you tin can identify iii (iii) contexts.
- Events are global settings that define how Nginx handles connections in general.
- HTTP defines how the server handles HTTP and HTTPS connections.
- Server is defined inside the HTTP context. Information technology specifies server ports, document root, etc.
You lot can always add additional contexts.
Managing Nginx – Common Tasks
Terminate Nginx
To stop an Nginx server, run:
sudo systemctl cease nginx Restart Nginx
To restart the Nginx service, run:
sudo systemctl restart nginx Reload Nginx
If you made some modifications to the Nginx main configuration changes. You demand to reload the server to propagate the changes.
sudo systemctl reload nginx Disable Automatic Get-go on Boot
If you don't want Nginx to automatically first on boot, run:
sudo systemctl disable nginx Configuring a New Directory
If yous are hosting multiple websites, a practiced dominion of thumb is to follow standard naming conventions. Let'south use cPanel's standard naming and create a directory.
sudo mkdir -p /var/www/yourdomain.com/public_html Next thing y'all need is an index page. This will assist you lot examination the configuration.
sudo nano /var/www/yourdomain.com/public_html/index.html For testing purposes, input a single line of text in index.html. Save and close the file.
Modify Linux file permissions, then that data can be accessed online.
sudo chmod 755 /var/www/yourdomain.com/public_html Attempt opening the index.html page. Information technology should be available online.
Conclusion
Subsequently successfully installing Nginx on CentOS 7, many opt to fully install LEMP stack, an alternative to the well-known LAMP stack. LEMP is an acronym; each letter stands for a single open-source component.
- L – Linux OS
- E – Nginx (pronounced as you would pronounce 'engine x')
- One thousand – MySQL or MariaDB relational database management system
- P – PHP for hosting dynamic websites
Each component 'sits on tiptop of the other.' Your Linux OS serves as the base layer.
On tiptop of that sits Nginx, your web daemon. The relational database management system stores all the data candy and served by your web daemon. Finally, PHP allows users to interact with that data.
For newer versions of CentOS, cheque out our article on installing and configuring Nginx on CentOS viii.
Was this commodity helpful?
Yes No

Source: https://phoenixnap.com/kb/how-to-install-nginx-on-centos-7
Posted by: lukequeleandon1970.blogspot.com
0 Response to "How To Install Nginx On Centos"
Post a Comment